Enabling outbound relay feature
| Situation | Users are unable to send emails through Proofpoint Essentials' outbound relay feature. |
|---|---|
| Solution | Make sure that the Outbound Feature is checked and the outbound connector is pointing to the Proofpoint Essentials Smart Host. |
Enable the Outbound Relay feature for the company.
- Log in to the Proofpoint Essentials user interface.
- Type the customer name into the search bar (top header)
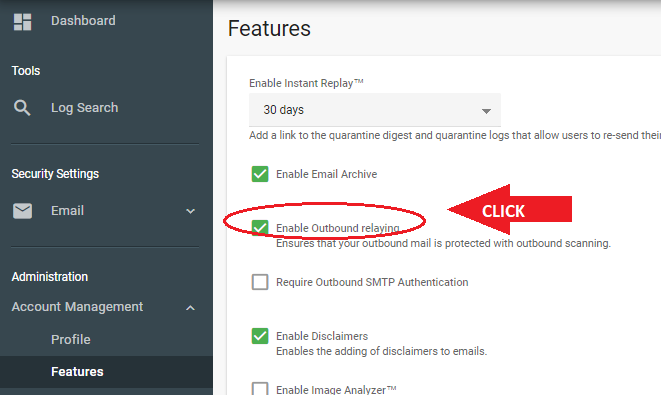
- Navigate to Administration > Account Management > Features.
- Check the box next to Enable Outbound relaying.
Configure The Mail server send connector to use the Proofpoint Essentials smart host.
Accounts are assigned to either the US or EU locations.
You can see in the portal URL which area your account is in, for example, US1/US2/US3/US4/US5.proofpointessentials.com (US) or EU.proofpoint essentials.com (EU)
The relay destination you must use for setting up customers depends on your location. If you are not already aware of which smart host address is assigned to your account, please get in touch with either support or your account manager.
- The relay/smart host destination where all mail should go is one of the following two options:
- outbound-us1.ppe-hosted.com (All US users use this hostname)
- outbound-eu1.ppe-hosted.com (EU users use this one)
- You can test connectivity to Proofpoint Essentials by typing and executing the following from a command prompt on the email server of the organization: telnet [Smarthost Address] 25
- You should see a message saying Welcome to Proofpoint Essentials ESMTP Server, amongst other things. (enter quit to close the connection.) If you do not see this message, examine the outbound settings on the firewall between the server and the internet.
Enable inbound mail relay.
Proofpoint Essentials requires the inbound mail relay to be enabled before the outbound mail flow can work.
From the sidebar, navigate to Administration > Account Management > Domains
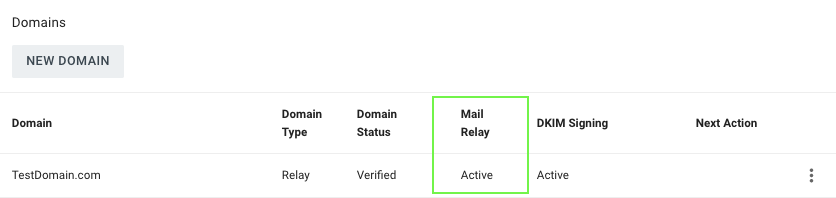
If the Mail Relay is not set as Active, please go through the domain verification steps and then enable the relay.
Add The correct sending server IP address to the list of Outbound servers
Proofpoint Essentials MTAs are updated every 30 minutes. Therefore new sending server details may not have been applied. (The Proofpoint Essentials system uses this as a dual form of relay authorization, with the other being that the user exists.) To verify the outbound, IP has been registered:
- Log in to the Proofpoint Essentials user interface.
- Type the customer name into the search bar (top header).
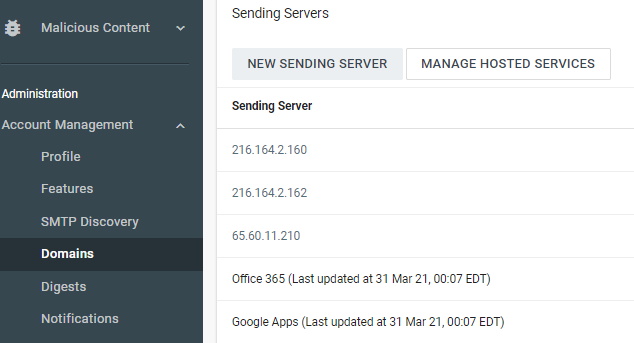
- Navigate to Administration > Account Management > Domains.
- Under Sending Servers, click New Sending Server.
- Enter in the IP range (We only take CIDR of /24) or IPv4 and click Save.
SMTP Authentication
Proofpoint Essentials also offers SMTP Authentication in place of configuring mail server IPs from the previous section. Please note this can be used in addition to existing mail servers in the previous section as well.
Please see our KB on SMTP Authentication
Further Troubleshooting
Propagation Time
- Changes made to the Outbound Relay feature or Sending Servers list require up to 60 minutes for those changes to replicate across the Proofpoint Essentials environment per our timing KB. Outbound email will not start flowing until propagation has completed.
- If the above have been confirmed and you are still experiencing issues sending mail through the Outbound relay feature, the SMTP logs of the sending server should provide an indication of the issue.
PTR on sending IP
If the sending IP has no PTR record on it, this needs to be corrected at the DNS level.
- A Sending IP should have a PTR associated so recipients know this IP is being used to send email.
- If your PTR is a generic PTR given by your ISP/host, consider asking your provider to change this, so it looks more personal to the recipient servers.
Outbound Mail Scanning
- Outbound mail requires that a valid email address exist (outside of SMTP Discovery).
- Messages that score higher than 7 (similar to the inbound slider scale) will get quarantined.
- A reseller may be able to put a filter in place.
- We highly recommend to use our False Positive reporting process.