User Provisioning Options - How to Add Users
| Situation |
When a subscribing organization is using the Proofpoint Essentials service the minimum configuration is that one single domain is filtered by the Proofpoint Essentials service and adding users to the Proofpoint Essentials interface is an essential part of configuring a domain belonging to a subscribing organization.
|
|---|---|
| Solution |
In order to meet the needs of our subscribers, User Provisioning can be handled in a number of ways:
|
LDAP Discovery
LDAP Discovery is the recommended method of adding user to the platform. This allows admins to import their users email addresses and security groups directly from a client’s Microsoft Active Directory. LDAP Discovery is a one way synchronization for your protection and requires read only permission of an Active Directory server.
Please contact Microsoft support for any questions regarding your Active Directory settings.
Configuration of LDAP discovery requires a basic understanding of Active Directory and requires some minor firewall modifications: see LDAP Discovery
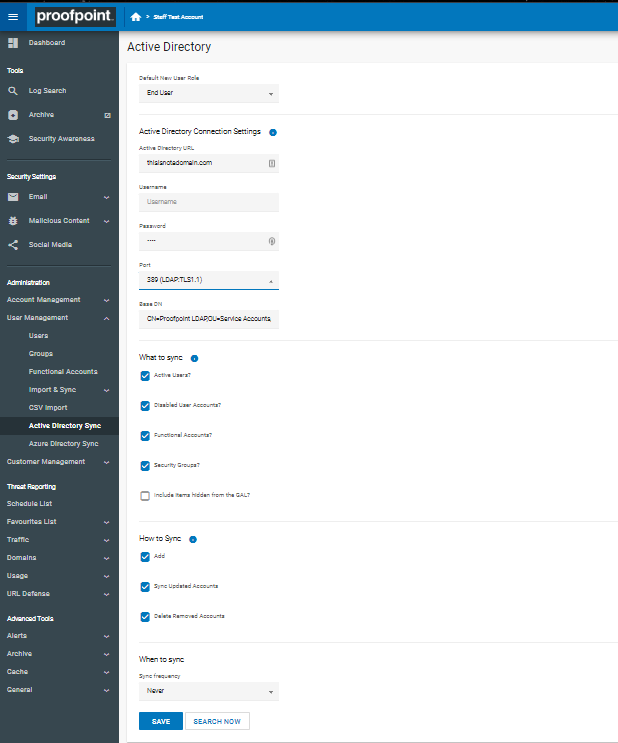
Adding Users by Active Directory
- Navigate to User Management > Import & Sync > Active Directory Sync.
- From the Default New User Role dropdown, select the desired profile:
- End Users receive a welcome letter once added to the system. The welcome letter will include details about the quarantine email as well as login information to access the user interface.
- Silent Users do not receive a welcome letter when loaded into the system. Their profile can be changed (i.e. to an end user) at a later stage.
- In the Active Directory URL field, specify the URL or IP Address to access the organization’s Active Directory.
Port 389 (LDAP) will need to be accessible to Proofpoint Essentials IPs in order for this method to be used.
- Enter an Active Directory Username and Password that can be used to import email-enabled objects such as users, Security Groups and Distribution Lists.
- Enter the Base DN.
- This is the LDAP query that Proofpoint Essentials will execute to capture all mail-enabled object information.
- If you do not know what your base DN is please consult your network administrator.
- Under What To Sync, choose what items you would like to sync.
- Under How To Sync, choose additional sync options (e.g. updated synchronized accounts, etc.).
- Under When To Sync, choose if you would like to enable a daily sync between Proofpoint Essentials and the organization’s Active Directory.
- Click Save.
The Active Directory connection information will be validated and, if successful, a result set will be displayed for review. If the data is accurate, click Proceed to import the users. The Active Directory sync will overwrite previously created accounts along with their permissions. Therefore, you will need to update the organization admin account. Refer to the Manually Adding Users section in order to update user settings.
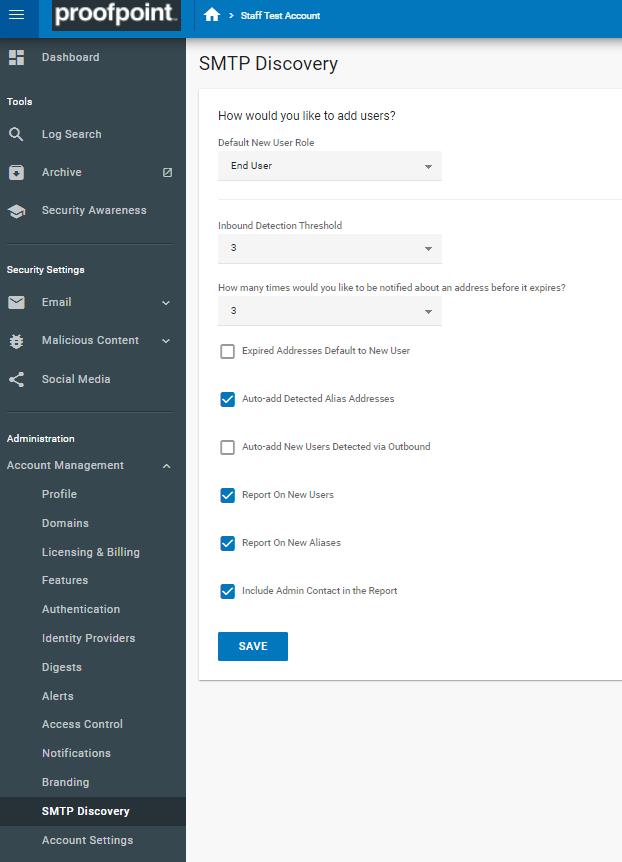
SMTP Discovery
Default method enabled, SMTP discovery will accept email traffic for non-registered users based on predefined settings (e.g. number of times where the SMTP address has been identified). It will also send out a weekly report to the organization administrator so that they can set the address as either invalid or active. SMTP Discovery will be disabled if LDAP 24 hour sync is enabled.
Adding Users by SMTP Discovery
- Navigate to User Management > SMTP Discovery.
- From the Default New User Role dropdown, select the desired profile.
- End Users receive a welcome letter once loaded into the system. The welcome letter will include details about the quarantine email as well as login information to access the user interface.
- Silent Users do not receive a welcome letter when loaded into the system. Their profiled can be changed (i.e. to an end user) at a later stage.
- Update SMTP Discovery settings based on preferences.
| Inbound Detection Threshold | The number of times Proofpoint Essentials should see this email address before including it in the SMTP Discovery weekly digest. |
| How many times would you like to be notified about an address before it expires? | The number of times the address should appear in the SMTP Discovery weekly digest before expiring. |
| Expired Addresses Default to New User | When enabled will automatically make an address a licensed user once inbound detection and expiration settings have been met. |
| Auto-add Detected Alias Addresses | Will automatically add an address as an alias when identified. |
| Auto-add New Users Detected via Outbound | If the organization is filtering outbound email through Proofpoint Essentials, than this setting will automatically create licensed users for non-registered accounts. |
| Report on New Users | Will deliver a report to the organization administrator identifying new users that have been automatically created. |
| Report on New Aliases | Will deliver a report to the organization administrator identifying new aliases that have been automatically added. |
| Include Admin Contact | Will include an admin contact in the report. |
- Click Save.
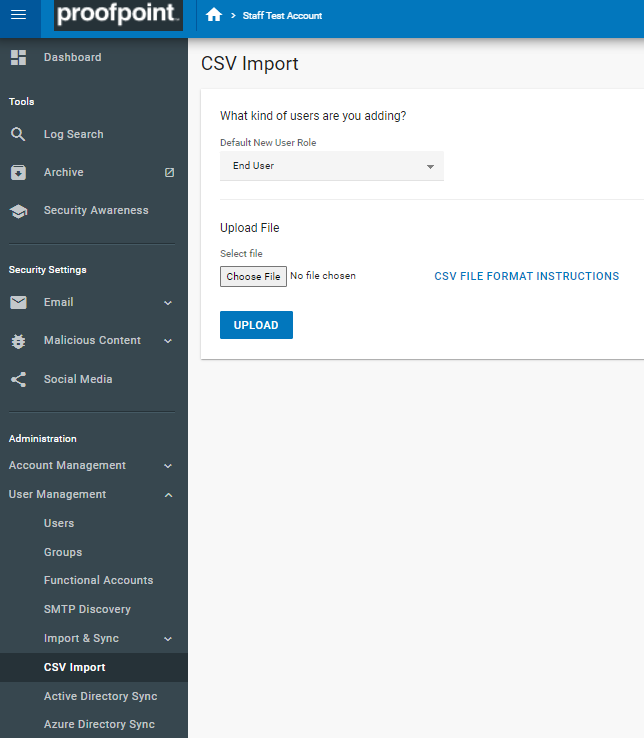
CSV Import
Due to the complexity of CSV Import it is only currently available to resellers. The current issue is with the possibility of overriding current list of users.
CSV text must be pasted into the dialog box under Management > CSV Import. And should be formatted First Name, Last Name, Primary Email address, followed by other addresses separated by commas.
To load a CSV File
- Navigate to Administration > User Management > CSV Import.
- From the CSV Type dropdown, choose the standard option will be chosen.
- Standard CSV: A basic file format that includes first name, last name, primary email addresses and aliases.
You can view an example of the file format you selected to import by clicking on the CSV File Format Instructions.
- From the Default New User Role dropdown, select the desired profile.
- End User: Receive the quarantined digest and can login to the Proofpoint Essentials user interface.
- Silent User: Receive the quarantine digest and are not granted access to login to the Proofpoint Essentials user interface.
- Click Choose File and locate file you wish to import.
- Click Upload.
Once you upload the file, the system will report the number of successful or failed entries imported. If there are
errors reported, review the message and repair the file as instructed. Successful addresses will be imported and
visible under the Administration > User Management > Users.
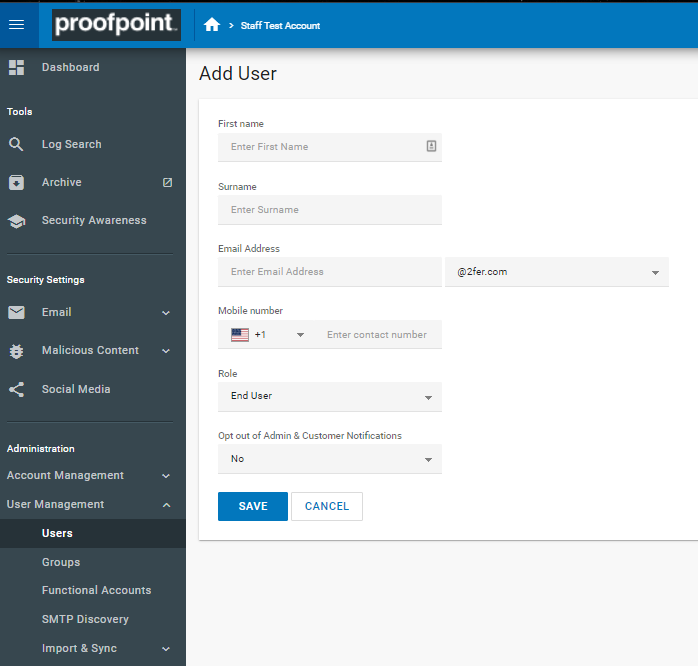
Manual Creation
Manual creation allows for the individual creation of user accounts and assignment of aliases as well as the elevation of user privileges.
- Navigate to User Management > Users.
- Click Add a User.
- Enter the appropriate User Profile information, such as:
- First name.
- Surname.
- Email address.
- Mobile number.
If you are going to enable 2FA through Proofpoint, the mobile number field is required. See KB- Configuring 2 Step Authentication
- From the Role dropdown, select the desired profile.
- End User - will receive a welcome letter once loaded into the system. The welcome letter will include details about the quarantine email as well as login information to access the user interface.
- Silent User - will not receive a welcome letter when loaded into the system. Their profile can be changed (i.e. to an end user) at a later stage.
- Enter a password for the user (Optional).
- Click Save
New users are registered every half-hour. Mail will not flow to the new user until the change is propagated through the environment (Up to 60 minutes). If SMTP Discovery is enabled, users will be able to receive email immediately.
Newly created user had an email rejected and now not receiving emails from third party
If you tried creating the user account on any other third party site and it rejected because it was within the hour they may have put the address on a bounce suppression. You will want to check if there is such a list and if the new user is there remove it before sending another welcome email from the third party.
Question & Answer
Q. Can I have an admin account without a license?
A. Organisations are required to have one Org Admin account upon creation of a customer account. If this admin account is not required, or another user should fill the role. This change can be made after the account has been created