Adding Functional Accounts Manually
| Situation | How would I manually add a Functional Account. |
|---|---|
| Solution | Follow the below steps in the User Interface to add a Functional Account. |
Overview
Note- Functional accounts are best added using the Active Directory, however they can be manually added as well.
Functional Accounts
What Is A Functional Account?
From the set-up Active Directory: Functional Accounts in Proofpoint Essentials for all email enabled Distribution Lists / Security Groups that exist in the customers local Active Directory which do not already exist in Proofpoint Essentials.
Functional accounts are not real users, hence do not have a log-in. They do get mail filtered, and pass to the Exchange server for mail processing to be handled there.
Change Existing user to functional account
If you have a pre-existing user created by a sync service or manually added Click Here on how to convert the user to a functional account.
Note- Azure AD does not do well recognizing all groups as Functional Accounts. In fact, many times you must convert the user account to Functional account, and then exempt the account(draft) from the Azure AD sync. Otherwise, Azure will keep wanting to change it back to a user account.
Manually Adding
Follow the steps below to add a functional account.
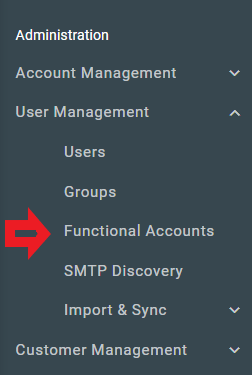
1.While logged into the user interface, navigate to Administration > User Management- Functional Accounts.

2. Click Once in the Functional Accounts area click the Add a Functional Account
3. Enter the Name.
4. Enter the Email address.
5. Select the Account type (Security Group or Distribution Group) from the dropdown.
6. Click Save.
Timing - Adding a functional account in general adheres to our standard email creation timing.
Please use this the link below for more information on Active Directory settings